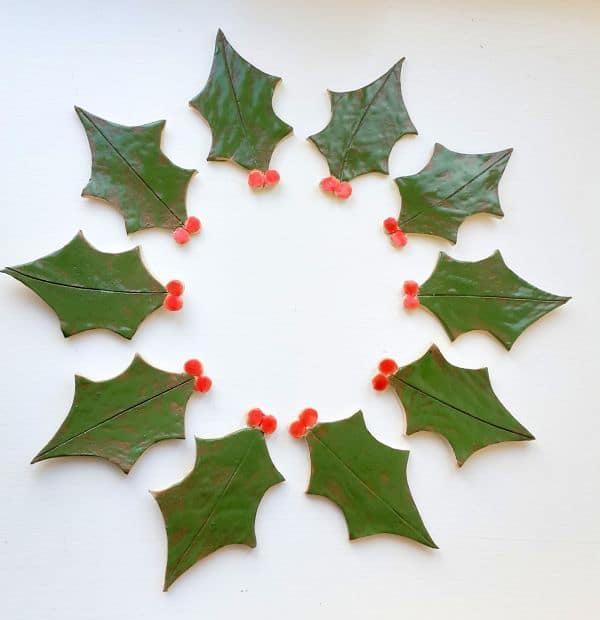
Category Archives: Projects
Recycled Glass Bottle Garden Border
If you look closely at the border along the lawn in this picture, you should see lots of shiny circular objects all lined up in a row…

The circles are in fact empty wine bottles that have been pushed into the ground to create a recycled decorative and quirky garden border.

This is one of my Dad’s latest ideas and I took these photos in his garden last week when all we had was rain, rain and more rain.

The bottles look great in the sunshine with the light reflecting off the glass. Although it took a while for the bottles to build up, this is a fun and easy project to brighten up your garden this summer!
Hazel Twig Fence

I had to share my new hazel twig fence with you! I love it! It was so much fun, especially collecting the branches from the woods. My dad had made a fence in his garden and as soon as I saw it I had to make one too. The fences aren’t very practical, just ornamental and decorative, they add a really nice rustic look to your garden.

First we had to locate some hazelnut trees. In woodland areas you would probably be surprised at how many there are scattered all over. They are easy to spot – tall thin vertical branches with the odd leaves growing here and there. Make sure you take a little saw or some secateurs to cut the branches down – they are very strong!

If you can find any thicker branches these are good to use for the posts.
Pull off the leaves and cut off any jagged bits so that you are left with a pile of straight, clean wooden sticks. Begin by cutting the posts to size, taking into consideration the height you want your fence to be, and also plenty extra for the posts to be positioned in the ground. My fence was about 30cm high and I left about 15cm for the posts to go in the ground, so each post was 45cm tall.

Hammer the posts into the ground first. Depending on how hard or soft the ground is, they may be able to push in. The further down in the ground the posts are, the stronger the fence will be. The rest is easy and takes no time at all! Weave the hazel branches in and out of the posts. They are so strong that they stay in place by themselves. Once you’ve reached the top of the posts and are happy with the amount of branches, cut off any excess at the ends and use cable ties to tighten any areas that are a bit loose. I only had white cable ties but you can hardly notice them as they have been coloured in with black pen!

If you want to continue the fence at an angle, start again with more posts. Effective isn’t it?
Below are some other creative ideas I found using twigs and sticks. I will no doubt be trying all of these too!

3. Twig Frame
And look at this!! Hazel branch walls made in the same way. Amazing!

Playing with Pebbles
I had an idea what I wanted to use the pebbles for, but had been looking for a particular type of mirror for a while. Yesterday I came across the perfect mirror (in a sale – bonus!), and spent the evening last night arranging the pebbles like a jig-saw around the edge of the mirror to create a border.
The pebbles were stuck down onto the mirror using a hot glue gun. Doesn’t it look fab!
(and another photo just to show off the beautiful pink hydrangeas in the garden…)
The mirror is going to be hung up in our downstairs bathroom. This is where Dave comes in handy
I used the rest of the pebbles to decorate the borders of some flat clipped photo frames, which will look lovely when I print off the perfect photos to go inside them. I’ll be sending one of the frames down to my friend in Plymouth with a photo of us and 2 other friends from when we were at the seaside, as a thank you for letting us stay. I hope she’ll love it!
How to make a Piñata
You will need:
- Balloon
- Newspaper
- Flour & Water
- Bowl
- Scissors
- Cardboard (i.e. cereal box)
- Toilet Roll Tubes
- Crepe/Tissue Paper
- Strong Glue
- String
- Marker Pen
- Coloured Paints
- Sweets
- Foil Tube
Mix a small amount of flour with water to form a watery glue paste. Cut strips of newspaper ready to be applied to the balloon. Blow up a balloon, and begin by dipping a newspaper strip into the paste so that it is completely covered, and smooth over the surface of the balloon using the paper-mâché technique. Continue until the balloon is completely covered, making sure each strip is overlapped slightly. Hang the balloon up to dry overnight with a piece of string. Cover the balloon in another layer the next day, placing each strip in the opposite direction to the initial layer. Allow to dry again overnight.
To make the head, we used two halves of a jaffa cake box and paper-mâché’d them together, sticking on some ears too.
Cut small slits around one end of the four toilet roll tubes (legs), this makes them stay in place against the balloon easier.
Once the balloon has dried fully over night, position the legs evenly underneath and mark where they are with a marker pen.
I found it a lot easier to initially glue the legs into place using a hot glue gun to hold them securely. I then added more paper-mâché around the tops to smooth it out.
Next is the fun part! Pop the balloon using a pin or scissors, cut a hole big enough to fill with sweets and remove the balloon.
Cut some lengths of crepe or tissue paper (we used crepe paper as it’s a lot stronger than tissue), and cut some tassels along one side. Begin to attach the strips onto the body, using cello-tape to secure. We found it a lot easier for one person to hold the strips in place while the other sticks the cello-tape.
Continue to layer up the strips of paper in different colours. When you reach the top you will come to a big bald patch – cut one large oval of the next colour with tassels around the edge, and layer up different coloured ovals on top.
Add some zig-zag lines around the legs, or any other pattern you choose to jazz them up a bit! Make a tail using some thin card to form a cone shape, cover in crepe paper and decorate. Attach some tassel strips to the top of the tail.
DIY Tin Lanterns
Thank you for visiting my post about DIY Tin Lanterns… You may also be interested in my individually handmade ceramic homewares, accessories and gifts in my shop – take a look!
DIY Nature Wreaths
Up-cycled Journal
Growing Herbs
DIY: Tin Can Vases
Wind Chime Mobiles
Sketchbook Peeks Part 3


